Showing posts with label Crafts. Show all posts

3/13/2013

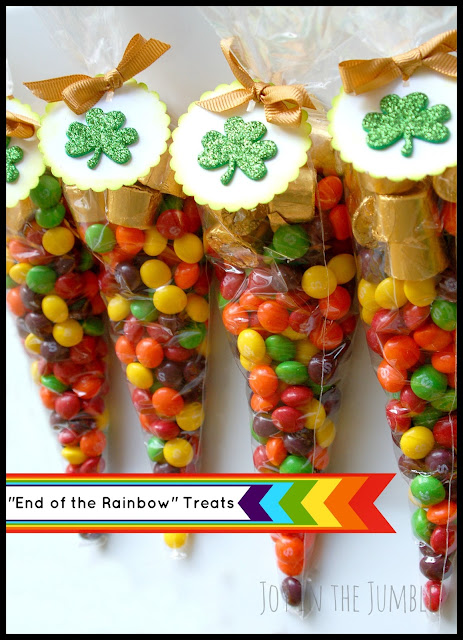
{Recipe} "End of the Rainbow" Treats


This "recipe" is so simple and quick to make.
I made this treat for Abbie's cousins and Asher's preschool friends.
It only cost $10 for this project...
Especially when using coupons at the craft stores.
I was able to get approx. 9-10 cones with this "recipe"

Supplies-
41 oz. bag of Original Skittles
1 large bag of Rolos Caramels
25 count package Cone Shaped Treat Bags (Hobby Lobby)
Gold Grosgrain Ribbon (Hobby Lobby)
Foam Glitter Shamrock Stickers Package (Joann's)
White Cardstock
2" Scallop Circle Punch
Hole Punch
Lime Green Ink Pad

"End of the Rainbow" Treats
Total Time- 60 minutes or less

Ingredients Per Cone-
2/3 cup Skittles
10 Rolos
1 Cone Treat Bag
6" Gold Ribbon
1 Shamrock Tag

Directions-
Take one cone bag and pour the Skittles in followed by the Rolos.
Punch out the white cardstock with the circle punch.
Ink the edges of the tag and affix the shamrock sticker toward the lower part of the tag.
Use the hole punch in the upper part of the tag.
Take the candy filled cone and do an initial tie with the ribbon.
Before tying the bow, slide the tag into place and complete the bow.
Trim the ribbon to desired look.
Give away to happy kids:)


2/04/2013

{Craft} Valentine's Wood LOVE Sign


I needed something cute to hang on my door for Valentine's Day.
It is so much fun to celebrate the holiday now that I have kids.

I picked up this pre-cut sign from a local wood shop.
The bead board letters and the heart shaped O were cute touches that made me happy.
I also had the idea to twist the wire into a heart shape, for the part that attaches to the hook.

I wanted the sign to have a weathered look.
So after I glued the bead board on...
I used a fine grit sand paper to remove and brush stroke lines and rough up the edges.
This makes a cute addition to our door...
Plus, it matches the rest of our Valentine's decor.


Click on link below to go to project-

Shabby Chic Key Decor


Miniature Frame Fingerprint Hearts

3/14/2012

{Craft} St. Patrick's Day Decor 3 Ways

 A couple of weeks ago, Pick Your Plum had a deal.
Well, they always have a deal, but this one was for St. Patrick's Day potential.

I have NO decor for the Day O' Green,
In fact, THIS was the first thing I have done in regards to the holiday. 

Back to the deal...
I was able to get 9 Mini Wood Shamrocks and 3 Large Shamrocks for a steal.
When I saw the deal, I immediately let Katherine from Irish Italian Blessings know.
From her blog name alone, you can tell that she digs this holiday.
Hop over to her blog and see her super cute crafts she made with the PYP deal.

All three of these projects were made with stuff I already had on hand...
so the only thing I had to purchase was the Shamrocks.
It was three easy projects that got rid of some of my craft stash.

Shamrock Pennant Banner


Ever since I saw THIS and THIS
I knew I wanted something similar.


Square Shamrock Wreath


Clouds and Rainbows Felt Garland

I now feel that we have sufficient decor this year, and that we can easily add to it next year.
Maybe I should take my Valentine's Day stuff down, 
So that only one holiday is up at a time:)

2/06/2012

{Craft} Valentine Ombre Heart Decor

I haven't really ever had Valentine's decorations.
I never really liked the holiday until I had kids.
Now it is a lot more fun...
So I wanted decor to make the holiday more exciting for the kids.
The color palette I am going for is Faded Brown/Tan, various shades of Pink, and White.
My first decoration can be seen HERE...
Below is the second...

 The Valentine Ombre Heart Frame


I have seen these ornate picture frames all over the blogosphere. 
I wanted one to add to my own collection...
So when Hobby Lobby had them on sale for 50%, I got one.

This project only cost me the price of the frame.
The paint chips I used for the hearts were free, 
I borrowed my Mom's off-set heart punch,
And used chipboard I already had on hand.

The greatest thing about this project is...
I can use this frame for multiple holidays/decor.
Hearts, 
Snowflakes, 
Autumn Leaves, 
Easter Eggs,
Baby Showers...
A very versatile project.

The Ombre Hearts are easy to put together.
Use the paper punch and paint chip strips...
Tape them to the chipboard using glue dots...
Slip the chipboard into the frame...
And you are ready to go with your custom decor.

2/01/2012

{Craft} Shabby Chic Key Decor

Want to make a simple decoration,
That costs less than $4...
And less than 20 minutes to make?

This Shabby Chic Framed Key works great for 
Valentine's Day
Easter
& Spring decor.

I made it in time for Valentine's Day.
I guess I could say it is the key to my heart, but I painted one of those for Matt last year.


{Supplies}
1- Off White IKEA Frame- $1.99
1- Brass Skeleton Key- Michael's $.75 with coupon
1- 1x36 in Coordinating Tulle Strip
1- 4x6 Piece of Scrapbook Paper  

{Directions}
 Take the back off of the frame
Remove the glass
Place scrapbook paper in the frame, and place the back back on
Fold tulle in half, and tie a slip know with it on the wall hanging bracket
Flip the tulle to the front of the frame, slip the key on, and tie a bow
Trim the tulle until symmetrical once you have the key hanging to desired length
Display and enjoy this Shabby Chic little piece of decor.


Not bad for $3 and 20 minutes of nap time.
I started and finished this project during the kids' Saturday nap after working overtime. 
I was still able to take a nap at the same time as them... 
Now that's what I call speed crafting with high impact:)

Linking to~ Two Yellow Birds Decor, Ginger Snap Crafts

12/14/2011

{Photography} How to Create Heart Shaped Bokeh with Christmas Lights

Last night the kids and I were playing in the living room.
All the lights were off, except for the Christmas Tree.
We danced, they climbed, I tickled, we all giggled.

I saw an awesome tutorial on Pinterest, about how to get beams of light to come off of your twinkle lights.  I thought I pinned it, but I can't find it anywhere. I wanted to give proper credit, but alas, I can't. Pinning FAIL.  There are a bunch of tutorials HERE, containing the same concept for the tree shots I got toward the end of the post.

For the heart shaped bokeh, I did my own thing. 
 I AM NOT A PROFESSIONAL PHOTOGRAPHER.
I tinker, so that I can learn.

There is an article linked to THIS PIN, but I didn't read it, so I don't know how they did it.
I know how I did it...
1 3x3 square of white paper with a small heart cut in the center.  
I did four different versions until I finally found the one the worked for me.  The first one I did was too big and made all of my twinkle lights look like Pac Man:)
I used my tripod so that everything was more stable.
I worked in Manual Mode
Aperture or F-stop set to f22 
Shutter Speed set to 25
ISO set to 1600
I took the camera off of auto focus (AF) and switched to Manual Focus for more control.
After taking different shots, I stayed in these camera settings and put Auto Focus back on for the tree shots below.
It was fun to tinker and test this concept... and to have it actually work:)
Pretty much the only editing I did to the shots was to airbrush the ISO pixilation out, and brighten it up from the airbrushing.  I love how all of them turned out.


This bokeh shot taken without the heart filter on.


12/13/2011

{Project Kid} Glow in the Dark Ornaments PLUS 5 Other Styles

This entire project cost me $2.50 for the six pack of ornaments.
Everything else I had on hand.
Cheap, handmade, silly...
Not too bad:)
 This was Abbie's favorite ornament.
She kept running to turn off the lights while I was painting other ornaments.
All I took was the clear glass bulb, poured in the glow in the dark paint, and swirled it around.
Abbie can't wait to hang it on the tree.
The glow doesn't last long, but she doesn't care because she ropes me into holding next to the light every time:)


Red and Green Nail Polish Marbling 
Inspiration and tutorial found HERE by my Bloggy friend Katherine

 I should have used a larger bowl for better coverage.  As it happened, I had to rotate and dip mine multiple times for complete coverage, and I damaged some of the polish in the project.  
It was a fun experiment, and Abbie loved watching/helping.


 Abbie's Snowman prints were painted with pink, and she wiggled her fingers around so hers are huge.
Asher's are blue and green and I could barely get paint on his fingers before he started to spaz out.  His are small and sparse.
 Inspiration found via Pinterest.
Tutorial HERE


 I love how the Epsom Salt "Snow" Ornament looks.  It is a little messy, but worth it.
Inspiration found via Pinterest
Tutorial HERE
I used thick Mod Podge instead of a glue stick


 Peppermint Candy Ornament.
White Paint poured and swirled inside, red stripes painted outside.
I don't like the Matte finish of the red, so I think I am going to go back and paint over it with an iridescent pearl. 


 Red with Green Glitter Polka Dots
Red paint poured inside, dots of Mod Podge covered in lime green glitter

12/09/2011

{Crochet} Flower iTouch Case

I am a lefty.
There is not much a can properly do with my right hand, except play the piano and crochet.
My Grandma is a righty, and she didn't know, many years ago, how to teach me left handed.
I started learning how to crochet in Jr. High, then I forgot about it, and lost the talent.
A few years later, I had to teach myself how to do it again...
That cycle has repeated itself over the years, and I am back to the point of really wanting to crochet.
Just check out my Pinterest board for all the projects I want to try.


I have a HUGE purse.
I kept losing the rubber pieces on my headphones, and they kept getting tangled.
I had some leftover yarn and figured that FREE was better than spending $15 or so dollars on a case.
I didn't use a pattern for this as it is just a basic rectangle folded in half and stitched up two sides.
I did double crochet for the body and single crochet for the flap to tuck inside.  
The flap was done only on half of the case...
So if the case was 50 stitches wide before I folded it in half, the flap was stitched on the back 25 stitches.
It sounds complicated, but it really wasn't. Plus, the flap is totally optional.

There are many different tutorials on how to crochet flowers on Pinterest, YouTube, and Google
The leaf was a formula I cooked up on my own, that happened to work.
I really like how this turned out...
Especially because I am on a Goldenrod kick right now:)
Bigger benefit is the fact that my iTouch is protected and it was FREE.

If you have any questions feel free to ask in the comments.

Linking to~
30 Handmade Days

12/05/2011

{Party} Eggplant Purple, Willow Green, and Cream Wedding

I posted about the first wedding I did HERE

These weddings were a week apart, and were vastly different in style, cost, and building location.
I loved the opportunity of working on both.

This Bride, Alyssa, is Matt's cousin... and very artsy.
We had lots of different idea swirling around, and it came together great.
Her colors were Eggplant Purple, Willow/ Olivine Green, and Cream.

Her centerpiece flowers, bouquet, and cake flowers were all made out of paper.
I made the centerpieces, and the bouquet and cake flowers came from Flowers From The Garden Shop on etsy.  Candace did a beautiful job on the bouquet... the crepe paper roses looked like real petals.

Matt's aunt and uncle are very talented and make the wedding cake for all of the niece's and nephew's, as a wedding gift.  This was my first time placing flowers on a cake, and I was so nervous.  There is no going back, and these were little paper flowers; not big fresh flowers that could hide a mistake:)

The refreshments were Gourmet Donuts from Beyond Glaze
The flavors were
Raspberry Mango
Chocolate Ganache
Maple Madness
Cookies and Cream
Blueberry Bliss

The drink was Hot Chocolate served with mini marshmallows, chocolate covered peppermint sticks, and my homemade vanilla bean whipped cream.

The archway decorated with rustic grapevine, twinkle lights and flowing fabric.

My pride and joy was the ceiling.  This picture does not do justice to how awesome it was.  This shot is with all the lights up, rather than dimmed. 
It was amazing to see the exact picture in my crowded and imaginative brain, come to life.
I had great help from the friends of the Mother of the Bride, to execute this endeavor.
I took a cream hula hoop and attached the gorgeous organza to it.
I also attached mini wrought iron buckets with matching purple and green satin ribbons.  We then completed the chandelier effect by stringing 300 one inch round mirrors and hung the entire apparatus around the center dome light.
With the lights dimmed and the twinkle lights doing their job of twinkling...
It was like walking into shimmery moonlit garden with diffused warm glow overhead and tiny flowers and birch twigs below.

There were other small touches I didn't get a picture of...
The bride and groom found an old door and painted it rustic and turned it into a picture wall.
The Mother of the Bride quilted a gorgeous bed spread that matched the wedding colors.
The little wrought iron birdcage for gift cards.
The wrought iron lanterns leading guests up to the entrance.

There was dancing, live music, cake all over the walls from the bride and groom.
I was afraid we wouldn't get to do a proper send off with the sparklers, because the snow was coming down so hard... but it worked:)

It was A LOT of hard work...
It turned out great and was worth the effort!

10/25/2011

Glitter Glam Pumpkins

Last Friday I guest posted over at Doodles and Doilies again.
You can see my first post HERE.

Today I am going to show you how to make Glitter Glam Pumpkins

Funkins are carvable, fake pumpkins from the local craft store that generally come in Orange, Black, and off white.
Supplies
1 large Funkin- white
1 small Funkin- any color as it will be covered by black paint
Martha Stewart Glossy Black Craft Paint
Martha Stewart White Pearl Craft Paint
Fine Black Glitter
Fine White Glitter
1 pack Black Glitter Spiders
Foam Brushes
Mod Podge
Hot Glue/ Elmers Glue


Take the large white funkin and brush on the Pearl craft paint. Once it is dry, paint Mod Podge on the top and partially down the sides at different levels.  Move quickly, and pour the white glitter on the Mod Podge.  Tap off the excess glitter, and set Funkin aside to dry completely.


Take the small funkin and cover with the black paint.  Because my funkin was orange, I had to do 3-4 coats.  Allow paint to dry in between each coat.  Take he Elmer's Glue and pipe glue into the funkin crevices at varying levels.  Work quickly and pour on the black glitter, covering the glue.  Tap off excess glitter and set aside to dry completely.


While the funkins are both drying, plug in your glue gun.  Once it is heated, take a spider and fill with glue on the bottom. Quickly place it on the funkin, and hold it there until the glue has had time to set up.
Place as many or as few spiders as you desire. 

Once the glue has hardened, your Glitter Glam Pumpkins are ready to display.

If you use coupons at your local craft store, this craft will cost you approximately $15.
Enjoy your Spooky Decor.

10/11/2011

{Recipe} Pumpkin Spider Cupcakes

It was so exciting to be guest posting over at Bear Rabbit Bear last week.
For the gueast post I made a
Spooky Halloween Cake Stand with Silly Spider Cupcakes

Supplies
Purple Charger Plate
Wood Candlestick
Rhinestone Spider Sticker
Black Swirl Rhinestone Stickers
Martha Stewart High Gloss Black Paint
Foam Brush
E6000 Glue
Total cost with coupons- $10 at Micheal's 


4 Step Directions
Step 1- Remove the metal candle holder in the top of the candlestick with a pair of needle nose pliers.
Step 2- Paint the candle stick Black.
Step 3- Glue the candlestick to the bottom of the plate, and let it cure over night.
 Step 4- Place rhinestone stickers in desired location.
This cake stand is for decorative purposes only, be sure to never place food directly onto plates- according to manufacturer's directions.
Display with cute little Pumpkin Chocolate Chip Spider Cupcakes and enjoy!


Pumpkin Chocolate Chip Spider Cupcakes

1 box Spice Cake Mix
15 oz can Pumpkin Pie 
1/2 cup Applesauce
3 Eggs
3/4 cup Semi Sweet Chocolate Chips
Mix first four ingredients until blended, then add the chocolate chips.  Pour 1/4 cup of cake batter into 24 cupcake liners.  Bake at 340 degrees for 15-20 minutes.
Once the cupcakes are cool to the touch, place them in these spider leg cupcake frames.  I got them on sale at Micheal's... 4 for $2.75.

Chocolate Buttercream Frosting

1 stick Butter- room temperature
1/2 cup Cocoa Powder
4 cups Powdered Sugar
2 Tablespoons Milk

Cream butter, then add other ingredients.  Mix until incorporated, scraping the sides frequently.
Place the chocolate frosting in a pastry bag with Wilton Tip #233 (the grass tip) attached.  Squeeze the pastry bag, and let the frosting begin to fall onto the cupcake in random formations until the top is covered.
Place to Royal Icing Eyes (found HERE for an excellent price) on each cupcake.
Set it out as a spooky surprise for the kids and watch their faces light up:)